


1991-2005 Acura NSX Leather Seat Upholstery Installation Guide

Tools Required For Acura NSX Leather Upholstery Installation
- Door Panel Removal Tool (can be substituted with Flat head Screwdriver)
- Metric Socket Set
- Phillips head Screwdriver
- Hog-Rings
- Hog-Ring Pliers
- Tin Snips/Metal Cutters
How to Remove Acura NSX Seats
The Acura NSX seats are secured by four (4) bolts. These bolts are located at the ends of the seat rails. Move the seat all the way back to reveal the front two bolts. They are covered by plastic trim pieces. Remove the plastic using the door panel removal tool or a flathead screwdriver and then remove the bolts. After the front bolts are removed, move the seat all the way forward. You will see two more bolts covered plastic trim pieces. After all four (4) bolts are removed; tip the seat backwards to check for electrical connections. Unplug the connectors and remove the seat from the vehicle. Make sure to save all bolts, screws, and other parts for reassembly.
Before you can remove the factory covers, you will need to remove the power controls. They are located on the outside of the seat cushion, and are held in by Phillips screws (see Figure #1 below). Remove all of the screws, and then remove the plastic trim pieces.
Seat Cushion Upholstery Removal and Installation
Flip the seat over, so the bottom of the seat cushion is facing you. There are four (4) push pins that hold the cushion leather to the seat frame (see Figure #2, red circles). There is also a screw on each side holding the front of the bolster leather in place (see Figure #2, red arrows). Remove the push pins and and screws while you have the seat upside down. Afterwards, lift the front of the cushion upholstery up so that it is loose. You will also see two plastic clips that hold the listing wire in the foam to the seat pan. Squeeze the ends of the clips together and push the clips up from the bottom through the seat pan (see Figure #2, green arrows. Also Figure #3). Be careful not to break them. The back of the leather upholstery on the cushion is held in by a J-clip that is clipped to the back of the seat pan. It is easily accessible from the back of the seat.
After the cushion section is removed, you will see hog-rings along the perimeter of the cushion. Remove the hog-rings, and then fold the cover up to reveal hog-rings holding the insert seams to the cushion. Remove these hog-rings and remove the cover from the foam. Installation is the reverse of removal. Start with the cover inside-out, and then hog-ring the insert sections. Fold the cover over the foam, and hog-ring the cover to the perimeter of the foam. Set the cushion aside after the Leatherseats.com cover is hog-ringed to the foam.
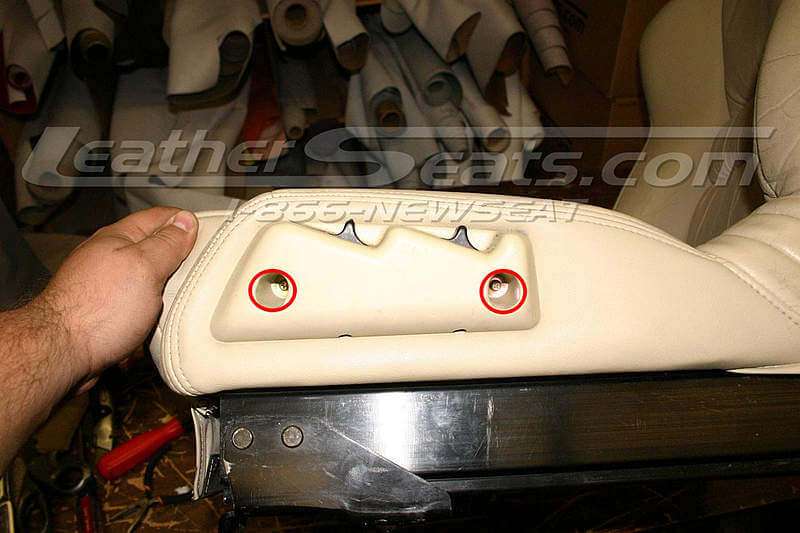
Figure #1
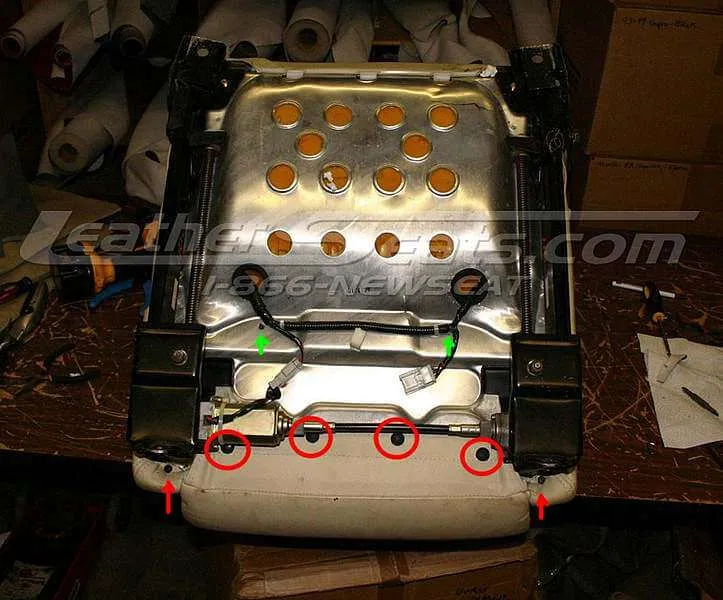
Figure #2
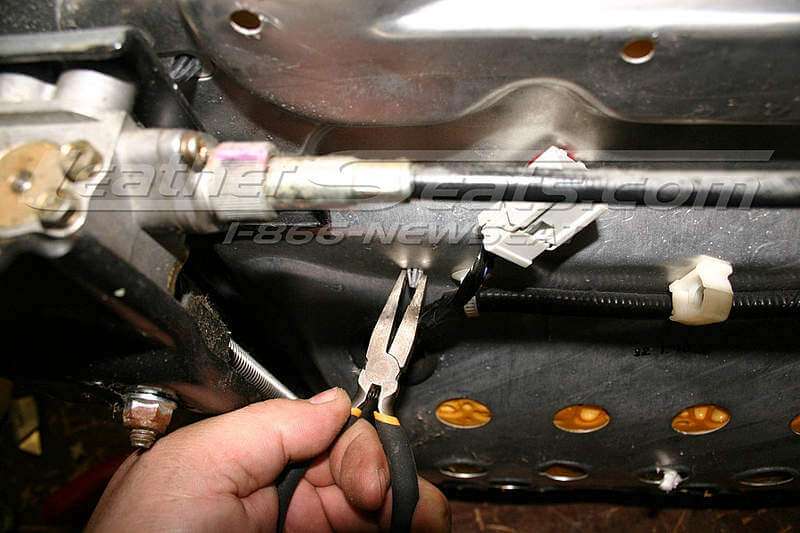
Figure #3
Backrest Upholstery Removal and Installation
The center backrest cover is very similar to the cushion. The main difference is the cover is attached by two J-clips, one at the bottom of the cover and one at the top underneath the headrest. There are also a few Velcro strips along the side of the insert. Just follow the same instructions for the cushion to remove the backrest section. Once you have installed the Leatherseats.com cover on the backrest insert, set it aside.
Now move on to the bolster sections by starting at the inside of the bolsters. The only things holding the inside of the bolsters to the seat frame are Velcro and pushpins. Use the door panel removal tool and pop the pushpins out and undo the Velcro as you come to the strips. After all of the pushpins are removed, roll the cover over the bolsters. The outside of the bolsters along the cushion section are held in by I-clips. You will have to pull the leather down to create some slack in the material, and then pry the I-clip out of the channel. You can use either a flat-head screw driver, or a pair of pliers. After you remove the I-clips, the cover should be free from the foam. The installation is the reverse of removal. Start with the cover inside out, and roll the covers over the bolsters. After the cover is lined up, poke holes for the push-pins near the headrest. Massage the wrinkles out of the covers and attach the Velcro sections. When you reach the cushion bolsters, start with the inside of the bolsters and make the holes for the push-pins. Install the pushpins first, and then install the I-clips on the side of the seat.
Acura NSX Headrest Upholstery Installation
After the insert section is removed, you will see the clips that hold the headrest in place. Remove the clips and pull the headrest out of the seat frame. On the bottom of the headrest, you will see another J-clip. Unhook the J-clip and start rolling the cover off of the headrest foam. You will need to compress the foam a good amount to remove the cover. If you are not concerned with keeping the old headrest cover, then you can easily cut off the old upholstery. Installation is the reverse of removal. Start with the headrest cover inside-out. Line-up the seams and start to roll the cover down over the foam. Once the cover is over the foam, massage the cover around to make sure that the seams line-up with the edges of the foam. A technique that we like to use to make this process much easier involves a kitchen size garbage bag, a shop-vac, and a second person. Put the headrest foam on the garbage bag, and then put the shop vac against the foam. Have the second person hold the garbage bag closed against the vacuum hose, and when the vacuum is turned on, it will suck the air out of the bag and compress the foam. Then it is much easier to roll the cover down over the headrest foam.
Reassembling Acura NSX Seats After Upholstery Install
Now install the top of the backrest cushion hooking the J-hooks together from the back of the seat and the top of the backrest. Slide the headrest in and re-attach the clips to hold the headrest down. Then finish installing the backrest piece, making sure to re-attach the plastic clips that hold the foam to the seat pan. After the backrest is in place, install the cushion section starting with the back of the cushion. Hog-ring the front of the cushion to the seat pan in the factory locations. The last step before re-installing the seat in the car is to cut the hole for the power seat switches and re-install the switches. You only need to cut the hole big enough for the wiring harness and the mounts for the screws. Just cut a small “X” in the leather/vinyl where the holes need to be. If you are unsure where to cut, start by cutting a small “X” in the middle of the section where the switch will be installed, and then look inside or feel inside to locate the screw holes. Make sure to plug the switches in before screwing the switch panel onto the seat.
Final Steps for a Factory-Fit Leather Upholstery Install
The final step is to put everything back into the car. Make sure that you reattach all the wiring harnesses! Be careful when removing/installing the seats from the car that you don’t scrape any plastic, metal, or the door panels with the bottom of the seat, as the seat rails are sharp and will damage any plastic, metal, or vinyl they come in contact with. After the seats are re-installed, it is a good idea to condition the leather and massage any wrinkles that are in the leather. After sitting in the sun for a few weeks, the leather will begin to shrink and will actually form itself to the foam even better, creating a wrinkle free install.


